I know, Kubernetes has a much bigger learning curve than just running Docker, and there are multiple services that run these for you that are, by all accounts, quite good (e.g Dokploy and Coolify). They’re even self-hostable. But, I wanted to learn how to run and manage infrastructure directly, so I decided to forego those options and just do it myself. That left 2 primary options – Docker Swarm, or Kubenetes. Docker is generally easier, and was probably the smarter choice. But I’m trying to learn about operating my code, and I wanted something that would let me add services, have them talk to each other without setting them up in a shared network, and could do automatic self-healing. Docker Swarm was close, but I was going to have to create a shared network between services. So instead, I went with Kubernetes. Specifically, running K3S, Kubernetes’s little cousin.
OK, so Kubernetes isn’t as quick and easy as say…running on ECS. To be fair, running on ECS isn’t as easy as I made it sound once you add in things like the load balancer, IAM roles and policies, underlying infrastructure behind ECS (or the math involved in trying to make sure you’re not going to get a surprise bill because you ran your cluster using Fargate). For whatever reason though, we like to think of those concerns as being “other stuff” that we don’t associate with running on a managed service. But it is, so if I’m going to have to set up a bunch of extra stuff to make my web app run not matter what, then I might as well go for Kubernetes.
For anyone curious about why someone would use managed services instead of doing it themselves, this is what I have to run 2 simple web apps (my gift registry project, and the Grafana LGTM all-in-one to get telemetry data from said gift registry), via https locally. For the record, my stuff is all in the infra and local
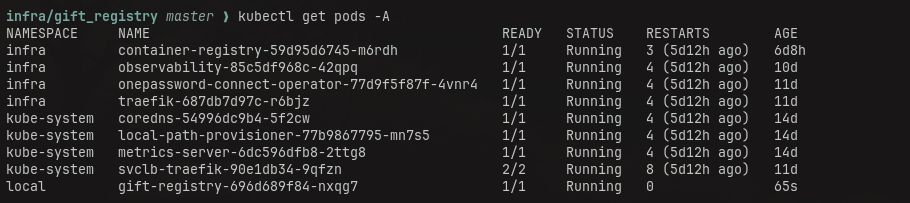
As cool as it is to have an infrastructure stack running locally, that I can (mostly) copy to a remote server, I see where Kubernetes gets its reputation for a steep learning curve. I had a basic knowledge of Kubernetes going into this (thank you DevOps Toolbox), which handled getting code running. But I needed a place to write telemetry and registry data, which meant I needed help on volumes. I needed to inject secrets without storing them in my (version-controlled) YAML files, so I needed secrets management. And I do some checking of request headers, so I needed something other than http://localhost, so I need Traefik for TLS termination.
First things first, I used OpenCode’s Big Pickle in plan mode to help work through the YAML syntax for the various components. It was nice to treat the documentation as a queryable StackOverflow, and have something proof-read the generated YAML (I messed up indentation levels more than once, so having that try to parse it and flag the issues saved a lot of debugging time). That said, I still wound up taking the LLM’s snippets once I had a basic understanding of what the clanker was doing.
Secrets Management
Now, starting with secrets – like I said, I didn’t want to commit any secrets into Github. I know there are vault services, but this is a personal hobby project, and I already use 1Password, so I decided to have that be the secret store. Sure enough, there’s an operator that can run in my K3S stack, and get values from 1Password when I need them. Basically, an operator is a custom Kubernetes component, in this case one that reads data from 1Password for use in my other pods. Secrets stay in a safe place, and given that the operator is prepackaged already, most of the setup is in 1Password (with a little manual Kubernetes’ing). First, I needed to set up an access token that can be used by my local Kubernetes environment. Incredibly unintuitively, you’ll need to sign in on the 1Password.com website instead of a local app. From there, go to the Developers menu option to set up your service account token. You can give this access to a specific vault, in this case, the secrets I need for my app (and it’s supporting resources).
Once you generate this token, you’ll need to make it secret in your Kubernetes cluster, via the create secret command:
kubectl create secret generic one-password-service-account-token -n $YOUR_NAMESPACE --from-literal-token="$YOUR_TOKEN"
Once you have that done, it’s some simple bash to get the operator up and running in your cluster:
#! /bin/sh

# TODO: IT'D BE NICE TO HAVE A CHECK FOR IF I NEED TO CREATE THE SECRET HERE, BUT THIS IS A ONE-TIME SETUP

kubectl apply -f https://raw.githubusercontent.com/1Password/onepassword-operator/main/config/crd/bases/onepassword.com_onepassworditems.yaml

helm repo add 1password https://1password.github.io/connect-helm-charts
helm repo update
helm template connect 1password/connect \
    --namespace $YOUR_NAMESPACE \
    --set operator.create=true \
    --set operator.authMethod=service-account \
    --set connect.create=false \
    --set operator.token.value="" \
    >1password/onepassword-operator.yml
It’s important to note here – you’re running this in a namespace, but any deployment in any namespace can now reference your 1Password secrets in their YAML files. Congratulations, 1Password is now managing your Kubernetes secrets.
HTTPS and Traefik
Next up chronologically was the container registry so my charts can pull the app images I built, but I’m going to skip ahead to Traefik (which wound up being 1 of the last things I added). It turns out, when running a web app in a local K3S cluster, you don’t get the the Sec-Fetch-* headers by default (at least in my case, because I was hitting http://{K3S_ip_addr}). The problem was, my app checks those headers in it’s middleware. So my app was starting successfully, and failing on everything because I didn’t have an HTTPS connection to the locally running app (and wasn’t connecting via http://localhost). Traefik can handle SSL (with the help of Let’s Encrypt), and forward all requests hitting the K3S IP to their appropriate pods. I know K3S uses Traefik by default, but I needed Let’s Encrypt to self-sign something that mapped to localhost, so I needed to set up my own Traefik pod.
First up for this, certifcates. Using Let’s Encrypt on a live server works just fine, as the domain is on a real name server and can go through a trusted set of certificate authorities. I’m setting up SSL for some URLs that only exist in /etc/hosts, on the authority of “trust me, I’m good for it.” So I needed to create some local SSL certs myself that can be used.
Traefik can be installed via a Helm chart, with some configuration values provided by you. It’s a few commands, which I wrapped up in a helper script so I could put all these steps in a Makefile to keep my life simpler:
#! /bin/bash

helm repo add traefik https://traefik.github.io/charts
helm repo update

helm install traefik traefik/traefik -n infra --wait --version 41.2.0 -f traefik/values.yaml
The values are some pretty basic configuration values, mostly so Traefik can set up the SSL certs:
ports:
  web:
    allowACMEByPass: true
    http:
      redirections:
        entryPoint:
          to: websecure
          scheme: https
          permanent: true

certificatesResolvers:
  letsencrypt:
    acme:
      email: "$YOUR_EMAIL_NOT_MINE"
      storage: /data/acme.json
      httpChallenge:
        entryPoint: web

persistence:
  enabled: true
  size: 10Mi
Local container registry
OK, on to the container registry. Kubernetes pulls containers from an repository. For established projects, like the LGTM all-in-one app, that’s no big deal. Just put the image data in the YAML and go. But for the app that just lives on my laptop, it’s a bit more of a challenge. Kubernetes only pulls from registries, not my local machine – but I don’t want to have to push every in-progress build to a real repository. So, I decided to just set 1 up on my laptop and push there. Now local tests pull my local images, and I don’t have to push something to a proper Docker repo until I think it’s ready for release (or at least public testing). This is just a pre-built container registry image that’s designed (I keep forgetting to test this) to remove images every day, so I can “push” incremental builds and “deploy” them, without blowing up my system resources. This will only ever live on my laptop, but I don’t know a way to run my app on a local Kubernetes without either pushing a bunch of in-progress images to a remote repository or hosting a simple, aggressively pruned repo. I chose the latter for localhost.
App observability
OK, that’s the supporting pods, on to actual apps, starting with observability. Like I mentioned, I’m using a Grafana all-in-one stack, so I’m not trying to spin up a bunch of little containers that have to talk to each other. I do need to set it up with an admin username and password, which are set by environment variables, which are handily stored in my 1Password account. Thanks to the secrets operator I have running, I can just reference the login I saved in 1Password and pull the secret without copying and pasting a username/password into my infrastructure repo. My first pass at this was just some raw Kubernetes YAML files, but going that route leads you to a depressing realization very quickly, environment-specific values are littered throughout a lot of the YAML files. This is why people use Helm, all the environment-specific stuff is in a single YAML file, and then everything else stays the same. Then you just tweak a command-line flag as you move through environments. Much cleaner to run, much easier to maintain, and significantly harder to read and reason about. But, like I said, once you get it set up, you’re likely changing your charts far less often than you’re changing your code.
The app itself
OK, now we’re on to the meat and potatoes, running an app that I’m actually trying to build. This is where I’m moving out of the infra namespace into a separate namespace for the application (I’m using local on my laptop, since the intent is to separate environments by namespace). I have this app’s infrastructure in a Helm chart as well (although my goal is to maintain a Dockerfile you can run on your own if you’d rather). To deploy it locally, I build the Docker image, and then locally I tag the image I just built with :latest, and push it to the container registry I have running locally (for “real” deployments, I’ll deploy it to a “real” container repository. I have this registry defined in my values.yaml so I can flip it for remote deployments). Now my YAML files can “pull” the image from the local repository apply it to my local cluster. Since most of the time, I don’t need to update the charts themselves, I can just update the container itself via kubectl rollout restart deployment gift-registry -n local.
Lessons learned
So how did this work out? Ultimately very well, I have the whole “deploy it locally” testing experience I originally wanted. I’m getting experience dealing with infrastructure as code for Kubernetes, which is great. Starting out with pure YAML is a lot easier, but once you start thinking about a second environment you start to see while Helm took over for how to deploy Kubernetes applications real quick. It makes your Kubernetes files harder to read (since they’re just generic templates full of placeholders), but it’s worth it to be able to deploy to 2 or more places.
Speaking of Helm, this command will build the actual YAML file for your stack (with populated values): helm template [NAME] [CHART] -f /path/to/values.yaml. This lets you confirm you have valid Kubernetes files for your application.
1 thing I ran into was I had tried to get my initial charts going out of order (I forget what I skipped, but something I tried to apply didn’t have a dependency running). The thing that tripped me up there was that there was no error message when I tried to apply it – just pods that weren’t running. I got it working eventually, but if you have resources that require a specific order, you’ll need to take that into account when you start applying the Kubernetes files. Whenever possible, set up prerequisites separately so you can confirm they’re running successfully before moving on.
If your container isn’t starting, it’s tempting to check the logs, but if things didn’t even progress that far, then you’ll want to check kubectl -n {namespace} get events. That will give you what the cluster tried to do with the containers. When I tried to start running pods while missing a resource in the cluster, this command is what helped expose the missing piece. As a quick reference – kubectl get events will tell you if your containers not starting is a Kubernetes problem, kubectl get logs {pod} will tell you if your containers not starting is a “your code” problem.
Volumes are a little less intuitive than in Docker, but the 3 main things to keep in mind for a volume mapped to a directory on your machine are the persistent volume, persistent volume claim, and volume mount (there are other volume types that don’t require a mount, but I’m just using a local volume for my work). My basic understanding here is that persistent volumes are the declaration that your pod needs a certain amount of space. The volume mount is the directory on your machine that provides that space. The persistent volume claim is the piece that tells Kubernetes to use the volume mount directory for the volume (“claiming the space on the machine”).
Here’s a “gotcha” that will absolutely burn you if you let it: a persistent volume claim will just grab the first thing that meets the minimum requirements of the volume. You’ll want to add a claimRef in the volume definition that links the volume to a claim:
claimRef:
    name: {{ $pvcName }}
    namespace: {{ $.Release.Namespace }}
The important thing to remember is that the name field in the claimRef has to match your PVC name. I didn’t include this claimRef at first, and my directories seemingly “switched” from what I had configured.
Helm certainly helped simplify some aspects of my infrastructure. Where it really came in handy was when I decided to distro hop and re-create my local infrastructure. The Helm charts made re-installation much easier (especially after I put them into a Makefile for easier running).
Getting started with Kubernetes, even just locally, was a lot more work than I thought. While I thought I was going to have to have some supporting pods, I had to set up more than I initially thought, but it’s exactly the type of thing I wanted to spend some more time doing. I’m nowhere near saying I’m a skilled Kubernetes operator, but it’s not intimidating anymore.
I think the only change I want to make to the setup is to switch plain old Traefik for Pangolin to set up tunnels for running this on a remote VM. For a first pass on a running environment though, this works really well. It’s clearly overkill for running an app in a local container to test it out, but it is really good at giving you a testable runtime, and letting you run your own (local) pipeline. If nothing else, I got some practice running Kubernetes, and learning something new is never a bad thing.